Earlier in our last blog, we explored the creation of custom cost type codes within the Landed Cost module and discussed improvement of item cost allocations. Next, let’s fast-track your workflow by integrating these codes into the Auto Cost Setup in D365.
Streamlined Efficiency:
By effortlessly integrating custom cost type codes into Auto Cost, we ensure a precise and automated allocation of charges directly to items. This strategic move streamlines your shipment processes, eliminating manual efforts and accelerating cost allocations in real-time.
Tailored Precision:
Customization takes center stage as businesses utilize these integrated codes for item-specific cost allocations. Consequently, bid farewell to generic cost assignments; instead, welcome a tailored approach that mirrors the unique aspects of your product lineup.
Key Benefits:
Precision in Allocation:
Ensure accuracy by allocating costs with surgical precision. The integration of custom codes guarantees accurate accounting for each item’s cost.
Efficiency in Operations:
Automate cost allocations for a more efficient workflow. No more manual adjustments—experience the ease of a system that handles costs in real-time.
Enhanced Financial Visibility:
Enjoy a clearer financial landscape with a deep breakdown of landed costs. Custom codes provide a detailed view for better decision-making.
Pre-requisites:
Before setting up Auto cost, you have to set up the “Item Cost Type group” and “Vendor Cost Type group” and assign the Item cost type group to the Item and the Cost type group to the Vendor. To do this, follow these steps.
Vendor cost type group Setup:
- Navigate to Landed cost > Costing setup > Vendor cost type groups.
- Click on New.
- In the Cost type group field, type a value.
- In the Description field, type a value and click save.
- Then navigate to Accounts payable > Vendors > All vendors.
- In the list, find and select the desired vendor.
- Expand the Miscellaneous details fast tab.
- In the Cost type group field, select a cost type group you just created and click save.
Item cost type group Setup:
- Navigate to Landed cost > Costing setup > Item cost type groups.
- Click on New.
- In the Cost type group field, type a value.
- In the Description field, type a value.
- Close the page.
- Navigate to Product information management > Products > Released products.
- In the list, find and select the desired record.
- Expand the Purchase section.
- In the Cost type group field, select a group you just created and click save.
Once the Vendor Cost type group and Item Cost type group is setup and allocated next thing, we need to look in is these two-apportionment method.
Volumetric Apportionment:
Volumetric apportionment method. This is how shipment companies usually calculate dimensional weight and actual weight, and then charge their users according to whichever is higher. Now, the question arising here is what Dimensional Weight is? Shipping companies usually determine the divisor for calculating Dimensional Weight, usually dividing the volume of an item by 5000 for weight in kilograms and by 138.4 for pounds, while the actual weight represents the normal weight.
Measurement Apportionment:
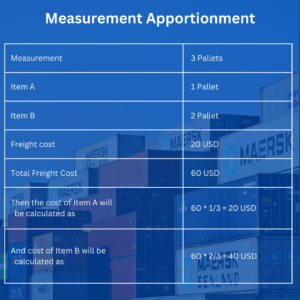
Next thing is measurement method this is basically for organization that don’t know the actual volume of the item, but they still need a method to calculate cost, measurement is not specific like volumetric this can be anything like height length volume size no of items etc. for understanding measurement have a look at following example.
Auto Cost Types:
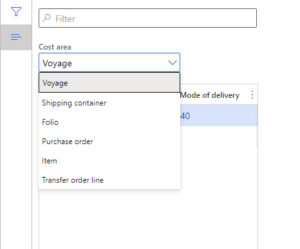
Now, let’s delve into the setup of Auto Cost, which operates much like a trade agreement, allowing you to allocate specific amounts to particular items based on your business requirements. You can allocate Auto Cost to Voyages, Items, Purchase Orders, Transfer Order Lines, Ship Containers, and Folios.
Auto Cost Setup:
Header Explanation:
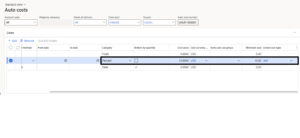
For a closer look at Auto Cost on Voyages, observe the settings below. Setting the “Account Code” to “All,” signify that the Auto Cost Setup applies to all created voyages. Alternatively, you can set it to a specific vendor cost type group or designate a particular shipping company by choosing “Group” or “Table,” respectively.
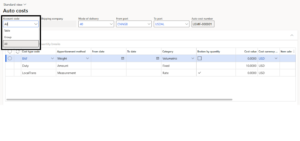
The “Mode of Delivery” field is the method through which the delivery occurs, whether it’s by Ocean, Air, or any custom value you’ve defined. In this setting, here it is specified as “40,” representing ocean delivery.
You can define the journey of your shipment using journey template by selecting values in the “To” and “From” fields, a separate setting in landed cost we will explore it in our future blogs.
Grid Explanation:
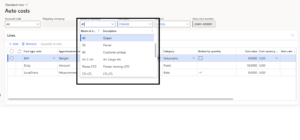
Moving on to the Auto Cost Grid, click on the “Add” button to create a new row. Then in the first column, specify the cost type code you created, classifying the type of cost (e.g., Duty, Freight).
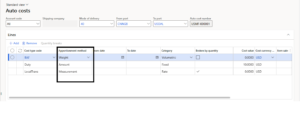
The “Apportionment Method” is chosen from a predefined drop-down, determining how the cost will be allocated to your voyages—options include percentagewise, fixed amount, quantity, volumetric, measurement, and more.
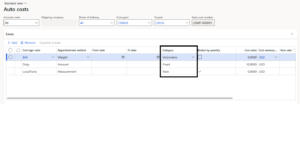
Proceed to the “From” and “To” date columns to define any expiry on duty. The “Category” column determines how the apportionment will impact the voyage amount; it is a predefined drop-down linked to the “Apportionment Method” column. Options include percentage, rate, fixed, volumetric, and others.
Next column is a check box of “broken by quantity” this can be used to define the quantity breaks to allocate different cost on different quantity.
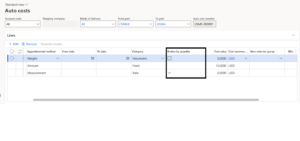
After that, there is a column for cost amount and currency code, which can be used to define the currency of values to be apportioned.
Moreover, you can also define the minimum cost if there is a requirement for a minimum cost in your cost allocation.
Additionally, if one cost is linked to another cost, like if duty is allocated as 20% of freight, you can select the percentage in the apportionment method of Duty with a cost of 20 and define freight in the linked cost.
So, this is all for Auto Cost for now we will explore more in our next blog, Happy Learning!
Thank You!